Apollo AutoScan Settings
Enabling the AutoScan feature of a Payter Apollo terminal requires custom configuration via the MyPayter portal. Fundamental settings that are essential for ensuring the terminal is always ready to accept card payments are defined, followed by an exploration of more advanced configuration options to provide a deeper understanding of how to tailor the system to any specific needs.
Basic Settings
This paragraph will explain the basic settings for AutoScan. These can all be adjusted using the MyPayter portal.
General Settings
General Settings includes universal options that apply to all terminals. These settings cover details such as terminal type, language preferences, and timezone. For AutoScan, be sure to select 'AutoScan' as the terminal mode.
Setting Name | Type | Description |
|---|---|---|
| drop-down | The terminal mode. Should be set to |
| drop-down | The terminal’s language |
| drop-down | Timezone of the terminal |
AutoScan Settings
After saving the general settings with 'Mode' set to AutoScan, a new tab called 'AutoScan' will appear in the basic settings menu. Clicking on this tab will open the AutoScan-specific settings. Some settings may only be visible in the Advanced view.
Setting Name | Type | Description |
|---|---|---|
| String | Abbreviation of the used currency, e.g. EUR for euro. Displayed alongside a product name. If "product-screen-show-amount" is not enabled in advanced settings, the currency won't be shown. |
| Boolean | Determines if Pulse functionality should be enabled. With the setting turned on, the terminal will only work when connected to its I/O board. |
| String | Title of the inhibit screen. This screen is shown when all products have been inhibited. Ignored if pulse if disabled or there are no inputs configured. |
| String | Subtitle of the inhibit screen. This screen is shown when all products have been inhibited. Ignored if pulse if disabled or there are no inputs configured. |
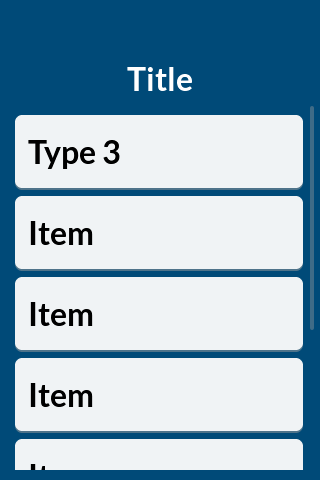
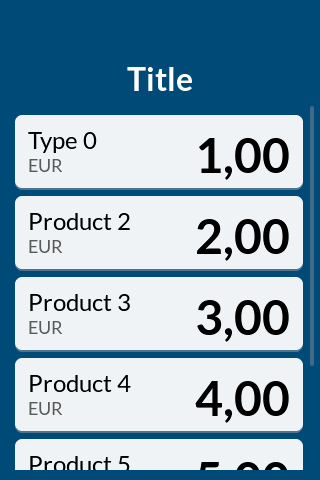
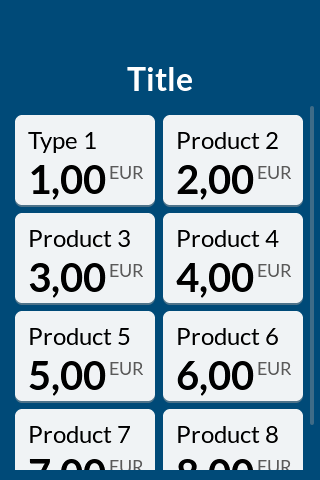
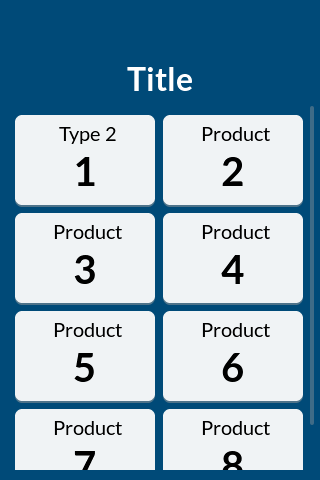
When enabled by each product toggle, it will reveal options for the product's label, amount, and reference settings. A minimum of 1 product is required for AutoScan to function.
Setting Name | Type | Description |
|---|---|---|
| String | Name of the product. When multiple products are configured, this is the name users can choose from in the user-interface. If there's only one product, the label is ignored. |
| Integer | Price of the product in its smallest unit, e.g. Euro Cents for EUR, Pence for GBP. |
| String | Transaction reference. This is a user reference for a product which then appears on transaction data within MyPayter’s reporting tool, helping to identify the product sold. |
| String | Reference of the product. Used by the Pulse application to match to a profile. See Apollo Pulse Settings for more information. |
| Integer | This setting is obsolete and should not be used. For older terminals: see Apollo Pulse Settings for more information. |
Adding A Start Screen
The start screen in AutoScan offers a valuable feature to greet users with a warm welcome message before they proceed to select their product or initiate a transaction. On this optional screen, users will encounter a button, with a configurable text prompt, such as "Start" or "Begin." Clicking this button enables users to continue to the product selection screen or, in cases where only one product is configured, directly to the payment screen.
Setting Name | Type | Description |
|---|---|---|
| Boolean | Enables the start screen |
| String | Title of the welcome message |
| String | Subtitle of the welcome message |
| String | Text inside the start button |

Example of a start screen
Advanced Settings
In AutoScan, advanced settings provide the ability to customize the application to suit specific requirements. These settings are grouped by their functionality, making it easier to configure AutoScan as required.
To adjust these advanced settings, simply navigate to the "apollo-scap-autoscan" tab.
Please ensure that the setting names entered in the MyPayter portal exactly match the ones listed in the tables below (unless a placeholder is specified). This ensures accurate configuration.
Additional Products
The basic settings in Autoscan default to configuring up to eight products, which meets the needs of most users. However, if additional products are required this can be achieved within the advanced settings. For each product the following three settings will need to be added, outlined in the table below.
In the table, you will notice the <id> placeholder within the setting name. <id> must be substituted with the specific number corresponding to the product, starting from 0 and incrementing for each additional product.
Setting Name | Type | Description |
|---|---|---|
| String | Name of the product. When multiple products are configured, this is the name users can choose from in the user-interface. If there's only one product, the label is ignored. |
| Integer | Price of the product in its smallest unit, e.g. Euro Cents for EUR, Pence for GBP. |
| String | In case |
| String | Reference of the product. Used by the Pulse application to match to a profile. See Apollo Pulse Settings for more information. |
| String | Transaction reference. This is a user reference for a product which then appears on transaction data within MyPayter’s reporting tool, helping to identify the product sold. |
| Integer | This setting is obsolete and should not be used. For older terminals: See Apollo Pulse Settings for more information. |
Example of a terminal with multiple products
Adjusting The Product Screen
The product screen offers users the convenience of selecting items like donation amounts, specific products or services, EV charge connectors, or quantities before proceeding to payment by tapping their card. When enabled within the option for multiple products in AutoScan settings, the product screen is automatically configured. However, for those who wish to fine-tune the appearance of this screen, there are several additional settings available:
Setting Name | Type | Description |
|---|---|---|
| String | The title above the products, e.g. “Select product” |
| Boolean | Shows the product’s amount in the button |
| Boolean | Enable to show the products listed in 2 columns |
Below are series of screenshots from the default Apollo terminal user-interface. These screenshots showcase the four possible configurations using the settings described above.
|
|
|
|
|---|---|---|---|
 |  |  | |
Changing the Card Detect Timeout
The card detect timeout determines how long the terminal waits for a card to be presented before aborting the transaction. The default timeout is 30 seconds.
The card detect timeout is the time limit for tapping a card after selecting a product. If only one product is configured and there’s no start screen, this setting is ignored. The default timeout that will be used is 30 seconds.
Setting Name | Type | Description |
|---|---|---|
| Integer | Timeout of a transaction in seconds. |
Adding a dispense screen
The dispense screen can be used to send a message to the customer after buying a product, like “Thank you for your purchase” or to indicate their product is now being prepared. The dispense screen will be shown after the transaction has been approved.
Setting Name | Type | Description |
|---|---|---|
| String | Title of the message |
| String | Subtitle of the message |
| Integer | Display time of the dispense screen, in seconds. |
| String | Name of the image to use as a background. |