Start Session
Start Session
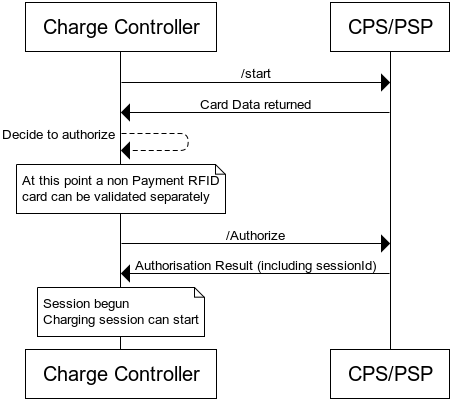
The goal here is to either Authorize a specified amount on an EMV card, or to validate a non-payment RFID card. In the case of the latter, the controller is given the data and can Decide to Authorize or not, depending on the card presented. In the case of an EMV Card, the controller is given a sessionId which should be stored for later use.
The EV Industry has aligned to three relatively standard ways to begin the Driver <> Charger interaction, and Payter has summarised these below with detail available in each page.
Use case scenarios | Description |
|---|---|
The Payter terminal is always scanning, and tapping a card, and the resultant returned Card data, is the trigger to start the charge process. | |
Tap to Start and Tap to Stop are often used together as the logic is similar. | |
The Payter terminal is idle until the charge controller starts it, following the charge controller detecting a vehicle has been connected. | |
Plug In to Start & Unplug to Stop are often used together as the logic is similar. The Unplug to Stop flow is the same as any other unexpected stop e.g. emergency shutoff. | |
Either the Payter terminal User Interface or the charge controller interface (if it exists) recognises the presence of a driver through on-screen prompts. | |
The UI Start flow can optionally be used to identify the charge station or plug to be used, where a single charge controller and Payter terminal are used to manage multiple charge points. | |
Understanding the customer journey is critical to developing a good solution. Payter terminals are designed with flexibility in mind, so Charge Controllers should contact us with any questions they might have around these flows.